How to vibe-code your own tender finder web app using the Open Opportunities API
- Ian Makgill
- Guides
- 08 Jun, 2026
- 25 Mins read
In our build vs buy piece we argued that, for a lot of teams, building your own tender finder is a perfectly good answer. If you only care about a handful of sources, or you're working at small scale, or you want something custom-shaped to your business, building is often better than buying.
This piece is about how to actually do it. It's written for people who aren't full-time engineers but who are comfortable using Claude to put a service together. Some people call this "vibe coding." We'll call it "working with Claude" from here on, because the goal is to take it seriously and end up with something that actually works.
We'll cover planning the project in the Claude app, setting up Claude Code, working with the API, getting the thing onto a server, and keeping it running. If you can write a clear paragraph and you have a credit card, you can build this.
One thing to know up front. This piece uses a few technical words you might not have come across before. We'll explain each one the first time it appears, but if something still doesn't make sense, ask Claude. "What's a repository?" or "Explain what an environment variable is, like I'm new to this" works fine. Claude is patient and will answer plainly. The whole point of working this way is that you don't need to know everything in advance, you just need to know how to ask. Treat Claude as the friend-who-happens-to-be-a-developer who you can call any time, including while you're working through this article.
What you're going to build
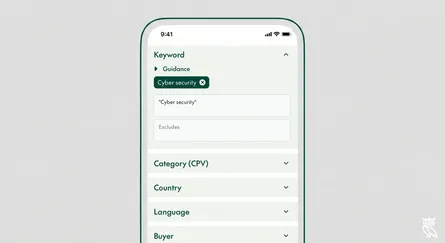
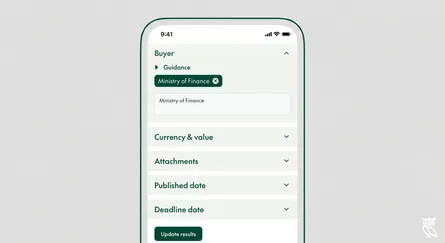
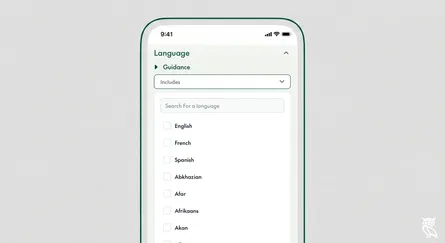
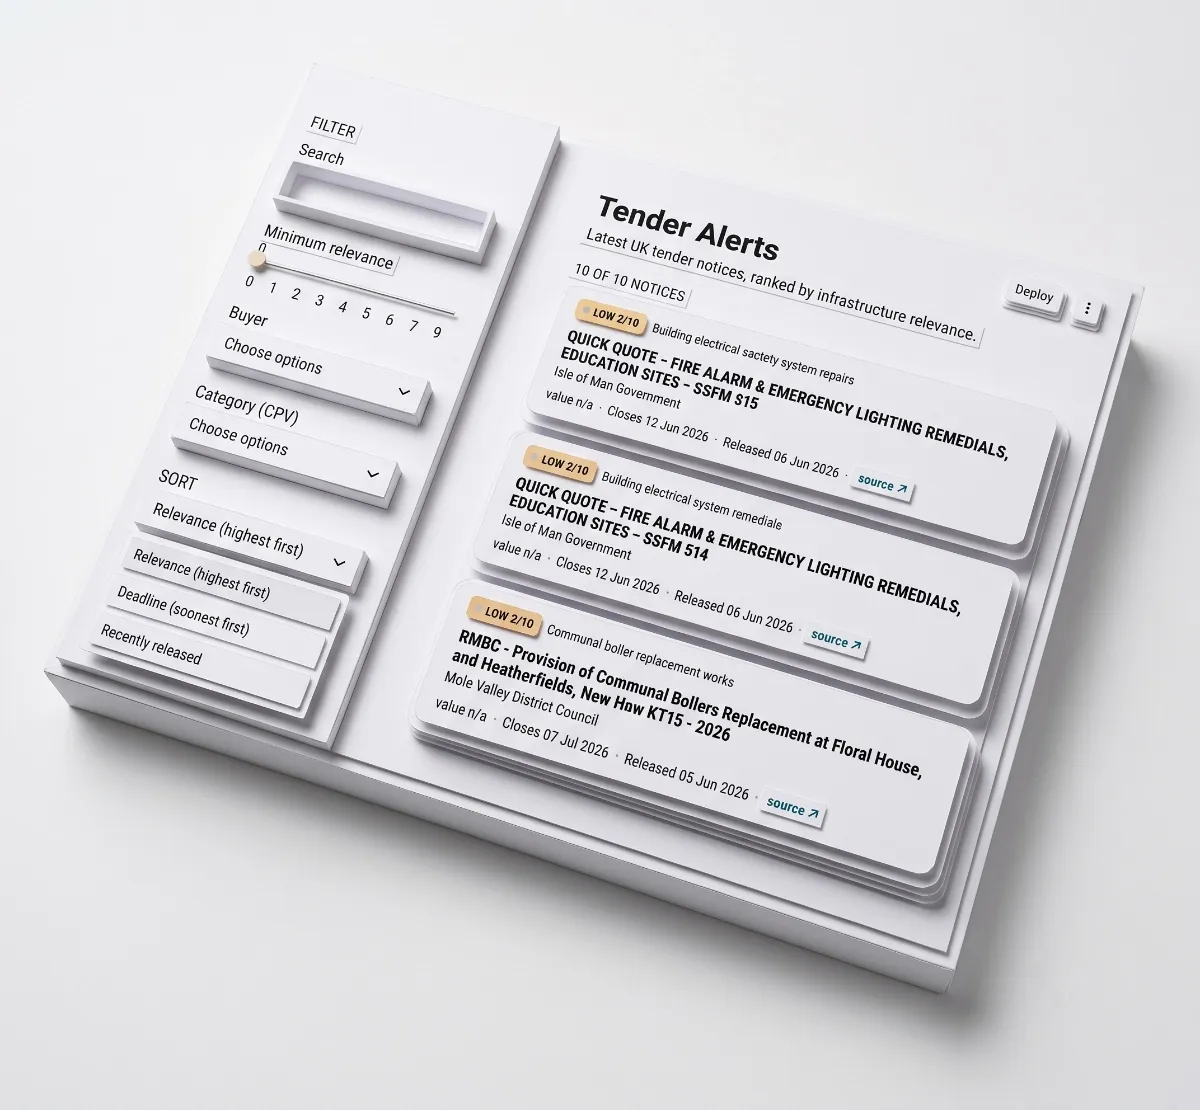
Before we go any further, here's what we're aiming at. The simplest, most useful version of this is a small web app that shows your team new procurement opportunities relevant to them, refreshed once a day, with the high-relevance ones flagged.

The whole thing is genuinely one piece of software. Your team visits a URL, the app asks the Open Opportunities API (the bit of plumbing that lets your code ask our system for tender data and get a response back, the same way your phone asks Google Maps for directions) for the latest notices matching the criteria you care about, sends each one to Claude for a relevance score and a category label, and shows the results in a sensible interface. No database, no scheduled jobs, no infrastructure beyond a single small web app.

We'll use Python for everything (the language we're writing the code in) and Streamlit as the web framework (a tool that lets you build a real, working web app without learning JavaScript). We'll call the Open Opportunities API directly from the app when a user loads the page, and we'll call Claude's API to score each notice. We'll run the whole thing on a small commercial server like Render or Railway (think of these as "the internet's hosting companies", you upload your code, they give you a URL where it lives).
The finished thing will look like a real web app your team will visit a URL, see a sensible interface, and won't have to think about how it works under the hood. If you want it to be private to your team rather than public on the internet, you can put a simple password on it later. We'll come back to that.
There's a deliberate simplicity here. The app doesn't store any data, doesn't run on a schedule, doesn't have anything to deploy beyond the app itself. Every time someone loads the page, it asks the API for fresh notices, asks Claude to rank them, shows the result. This is a perfectly good design for the kind of internal tool we're building. If you ever need history, search, or "show me what's new since yesterday," you can add a database later. For a first version, keep it light.
This is going to take a couple of weekends if you've never done anything like this before. It might take a couple of days if you have. Don't try to do it in a single sitting.
What this will cost you
Claude Pro is twenty dollars a month, which gives you access to Claude Code for the build itself. You need this. If you already have it, great.
The Claude API, which you'll use for the relevance scoring inside the app, is pay-per-use. For an internal team of five people checking the app once a day, with maybe thirty to fifty notices being scored on each visit, you're looking at a few dollars a month, probably under ten. The exact number depends on how often the app is used and which Claude model you choose; we'll suggest a sensible default in the build itself.
Hosting on Render or Railway is around five to ten dollars a month for the paid tier, which is what you'll want once you're using this for actual work.
The Open Opportunities API is currently priced on an "all you can eat" basis, which means any customer can access any document for a flat fee. We'll be bringing a per document fee structure soon. Get in touch and we'll talk you through the options, for a small team using this internally, our Expert tier is designed for exactly this kind of project. We'll set you up with a key.
Realistically, you're looking at thirty to sixty pounds a month for the whole running cost once it's built. Not free, but a long way cheaper than commercial procurement intelligence platforms, and you own what you've built.
The setup time costs you nothing extra. The maintenance time, as we'll cover later, is a few hours a month.
Phase one: planning your project in the Claude app
Before you open Claude Code, you should spend an hour or two in a normal Claude chat. Claude Code is the tool you use to write the actual software, but the planning work is much easier in a chat window where you can think out loud, change your mind, and end up with a clear document at the end.
The mistake most people make is opening Claude Code straight away and asking it to start building. You'll get something, but it won't be the thing you wanted, and you'll spend the rest of the week patching it. An hour of planning saves you days of patching.
Write a one-paragraph spec
Open a new Claude chat and tell it what you're trying to build. Be specific about who it's for and what done looks like. Don't list features yet.
Something like: "I want to build a small internal web app for our bid team. When someone visits the page, it should fetch new UK tenders from the Open Opportunities API, send each one to Claude for a relevance score and a category label, and show the ranked list on a simple web page. Done means it's running on a server with a URL the team can visit, and they're using it instead of checking portals manually."
Then ask Claude to push back on it. Ask whether it's clear, whether anything's missing, whether anything looks ambitious for a first build. Iterate. You should end up with a paragraph or two that you'd be happy to send to someone you trusted and have them understand exactly what you're trying to build.
What this conversation actually looks like
If you've never worked with Claude on a project like this before, here's the shape of the back-and-forth so you know what to expect.
You write: "I want to build a small internal web app for our bid team that checks for new UK tenders each morning and shows them to the team. The team works on infrastructure projects, mainly. Can you help me think through what I'm building before I start?"
Claude will respond with questions. Things like: how many people are using this, how do they want to be notified, what counts as "relevant" for your team, do you want documents included or just notices, is it okay for it to be public on the internet or does it need a login.
You answer each one in plain English. "Five people. They check the app each morning, no need for separate email alerts. Relevant means infrastructure-related — roads, bridges, water, that kind of thing. Just notices is fine for the first version. We'd prefer it to be private to the team."
Claude will then give you back a tightened-up spec, and probably point out something you hadn't thought of. You might say "yes, that's right" or "actually let's not bother with the login for now, we can add it later." After three or four rounds of this, you've got something solid.
This is the rhythm of the whole project. You speak in plain English, Claude asks the questions a developer would ask, you answer them, Claude proposes something concrete, you push back where you disagree. You don't need to know the technical words. If Claude uses a word you don't know, ask what it means. It will answer plainly.
Break the work into phases
Once the spec is clear, ask Claude to break the project into phases. A reasonable phase structure for this kind of project looks like this.
Phase one is local proof of concept (about an evening's work). You write code that calls the Open Opportunities API, parses the response, and prints results to your screen. Nothing fancy. The goal is to prove you can talk to the API and get sensible data back.
Phase two is the web app (a weekend afternoon). You wrap that code in a basic Streamlit interface that shows the notices in a list. At this point you have a working application running on your laptop, accessible at a URL on your own machine, just not on the public internet yet.
Phase three is the intelligence layer (an evening or two). You add the step where each notice is sent to Claude for a relevance score and a category label. The display then sorts notices by relevance, and the team sees the most useful results first.
Phase four is moving to a server, also called deploying it (half a day). You upload the whole thing to Render or Railway so it runs without your laptop being on, and your team can visit a URL to use it.
Phase five is hardening (a few evenings, ongoing). You add logging, error handling, caching so the app doesn't hammer the APIs on every page load, and the small touches that make the thing pleasant to use.

The point of phases is that each one ends with something that works. You're never halfway through a feature when you stop for the day. If you get bored or busy, you can leave the project at the end of any phase and come back to it without having to remember where you were.
Decide the tech stack and write it down
Ask Claude to list the languages, libraries, and services you'll use, and to justify each one. ("Libraries" are pre-built bundles of code that other people have written and made available, so you don't have to reinvent things like "talk to an API" or "format a date" from scratch. You'll use several of them, all installed for you by Claude.) For this project the answer is going to look like: Python, Streamlit, the Claude API for scoring, the Open Opportunities API for the data, and a small commercial server to host it on.
You don't need to understand every word of this yet. The point is to have it written down so the choice is made and you're not relitigating it every time you sit down to work.
Download the API documentation
This is the single most important practical step in the whole project. Go to the Open Opportunities API documentation. On that page you'll find a markdown file attached, click to download it and save it to your computer. You're going to put this into your project folder later so that Claude has the docs in front of it every time it writes API code.
This matters because LLMs hallucinate confidently against APIs they don't have docs for. Claude will invent endpoints that don't exist, use field names that look right but aren't, and write authentication code that doesn't match what the API actually requires. With the docs in context, the hit rate goes from "frequently wrong in ways you'll only catch in testing" to "almost always right, and when wrong, fixable by pointing at the documentation."
Write your CLAUDE.md
A CLAUDE.md is a markdown file that lives in your project folder. When you use Claude Code, this file is loaded into Claude's context at the start of every session. Without one, you'll be re-explaining your project every time you sit down to work. With one, Claude already knows what you're building.
Ask Claude in the chat to help you draft a CLAUDE.md based on the spec and the phase plan you've created. It should cover what the project is, the tech stack, how to run and test the code, and any conventions you want followed. Keep it short, sixty to eighty lines is plenty. You'll save this file into the project folder when you create it.
Write your coding protocols
These are the rules you want Claude Code to follow when it writes code for you. They go into your CLAUDE.md and they're more important than they sound.
The protocols we'd recommend:
Work on one feature at a time. Don't ask Claude to build three things at once, even if they feel related. You'll lose the thread.
Write the test first. Before Claude writes the code for a feature, ask it to write a test that describes what success looks like. Then ask it to write the code that makes the test pass.
Commit after each working feature. Use Git, commit when something works, and write a short note about what changed. This is how you go back when something breaks.
Ask Claude to explain before it changes things. If you're about to ask for a significant change, ask Claude to explain what it's going to do before it does it. This catches misunderstandings before they become work.
Never let Claude work for more than a few minutes without reading what it did. Working with Claude rewards short loops. If Claude is silently writing code for ten minutes, something is going to be wrong with it.
Add these to your CLAUDE.md as a "how we work" section. Claude Code will follow them.

If you'd like a head start
We've bundled the CLAUDE.md, API documentation, and config files we used for our own reference build. Download the starter pack. Treat it as a sanity check against your own draft, not a template to copy wholesale, your project will look different from ours, and that's the point. The version your team actually uses is the one shaped by your conversations with Claude, not ours.
Phase two: setting up Claude Code
Now you've got a spec, a phase plan, a tech stack, the API docs, and a CLAUDE.md. It's time to install Claude Code and start writing the actual software.
We're going to use the Claude Code desktop app rather than the terminal version. They do the same thing, but the desktop app is much friendlier if you're not used to driving a computer through a text interface. You'll see Claude's edits as visual diffs that you approve or reject with a click, rather than reading text in a terminal window. For a novice, this is the right starting point.
This section is written assuming you've never done much of this before. If you have, you can skim.
What you'll need first
Before you install anything, two things to know.
The Claude Code desktop app requires a paid Claude subscription. Pro at twenty dollars a month is fine for this kind of work. There's no free tier for Claude Code, so if you don't already have a subscription, sign up at claude.com first.
The desktop app runs on macOS and Windows. There's no Linux version, although Linux users can use the terminal version of Claude Code instead.
Install Python
Python is the language we're writing the code in. The desktop app doesn't install it for you, so you need it on your machine first.
On a Mac, Python is usually already there, but it's worth getting the latest version from python.org. On Windows, download the installer from python.org and make sure to tick "Add Python to PATH" during installation. Don't skip that tick box, things get harder later if you do.
You don't need to test it from the command line yourself, Claude Code will do that for you once you're set up. If anything goes wrong during the install, error messages, the installer refusing to run, anything you don't understand, open the Claude app (just a normal chat, not Claude Code yet), describe what happened, and Claude will talk you through it. This works ninety percent of the time.
Install Git
Git is the tool that tracks changes to your code. Every time you make a meaningful change, Git takes a snapshot, so you can always go back to a working version if something breaks. The snapshots live in something called a "repository," which is really just a folder on your computer with a hidden history of changes attached. When you put a copy of that repository on GitHub, your team (and your future self) can see the history, and you have a backup if your laptop dies.
You don't need to know any more about Git than this. Download it from git-scm.com and install it with the default options. Claude Code knows how to use it and will do the work for you once it's installed on your machine. Again, if the install gives you trouble, ask Claude.
Download the Claude Code desktop app
Go to claude.com/download and download the desktop app for your operating system. Run the installer. It takes a minute or two.
Launch the app from your Applications folder on macOS or the Start menu on Windows, and sign in with your Anthropic account. You'll see a window with three tabs at the top: Chat, Cowork, and Code. The Chat tab is just a Claude conversation, similar to claude.ai. Cowork is a cloud-based agent that works on things in its own environment. The tab we're interested in is Code, which is the interactive coding assistant with access to files on your computer.
Click the Code tab. If it prompts you to upgrade, your subscription doesn't include Claude Code and you'll need to move to a paid plan.

Create your project folder
Using Finder on a Mac or File Explorer on Windows, create a new folder somewhere sensible (your Documents folder is fine) called tender-finder. You don't need to use the terminal for this, just click "New Folder" and name it.
Inside the tender-finder folder, create a subfolder called docs. So your structure looks like:
tender-finder/
  docs/
You'll put files into both of these in the next step.
Add the API docs and your CLAUDE.md
Move the Open Opportunities API documentation file you downloaded earlier into the docs subfolder. The path should look something like tender-finder/docs/api-documentation.md.
Save your CLAUDE.md into the root of the tender-finder folder, not inside docs. So now your structure looks like:
tender-finder/
  CLAUDE.md
  docs/
    api-documentation.md
Open your CLAUDE.md in any text editor (TextEdit on Mac, Notepad on Windows) and add a line that says: "The Open Opportunities API documentation is in /docs/api-documentation.md. Refer to it whenever you're writing code that calls the API." This makes sure Claude actually uses the docs rather than guessing.
Point Claude Code at your folder
Back in the Claude Code desktop app, with the Code tab open, you'll be prompted to choose a project folder. Pick the tender-finder folder you just created.
Claude Code will read your CLAUDE.md automatically. From this point on, every conversation in this project starts with Claude already knowing what you're building, how you want it built, and where the API docs are.
Ask Claude to set up Git for you
This is the first useful thing to do in the project. In the Claude Code window, type something like: "Please initialise this folder as a Git repository, then help me create a private GitHub repository and connect it to this one." Claude will walk you through it, including signing in to GitHub if you haven't already.
You don't need to know what these commands do. Claude will run them, you'll see what it did, and you'll approve each step. By the time you're done, the project is under version control and backed up to GitHub.
You're now ready to write code.
Phase three: writing the code
The instructions from here are deliberately light, because the whole point of this approach is that Claude does the writing. Your job is to give it good instructions and review what it produces.
Work through the phases one at a time
Start with phase one from your plan. Tell Claude what you want to build, point at the spec and the API documentation, and ask it to write the code along with a test. Watch what it does. Ask questions if anything looks unclear.
When phase one works (you can run the code and see notices come back from the API), commit it to Git. Then move to phase two. Don't be tempted to skip ahead.
Handle the API access
You'll need credentials to access the Open Opportunities API, essentially a username and a password that prove your code is allowed to ask our system for data. We'll provide these when you sign up. If you don't have them yet, you can do all of phase one (setting up the project) and the planning work while you wait, then add the credentials when they arrive. Don't let this be a blocker.
You'll also need a Claude API key for the scoring step, which you can generate from console.anthropic.com once you've signed up. This is separate from your Claude Pro subscription, the subscription pays for Claude Code itself, the API key pays for the calls your app makes to Claude when it's scoring notices.
When the credentials arrive, Claude will ask you where to put them. The right answer is something called an "environment variable", a setting that lives on your computer (and later, on your server) outside of your code. The reason this matters is simple: anything in your code can get uploaded to GitHub by accident, and a password on GitHub is a password the whole world can see. An environment variable stays on the machine, never gets uploaded, and your code reads it at runtime. Claude will walk you through setting one up.
The key principle is that anything secret (API keys, passwords, webhook URLs) should never end up in a file that gets committed to GitHub.
Adding the intelligence layer
This is the bit that turns the project from "a list of tender notices" into "a tool the team actually wants to use." Once you have notices coming back from the Open Opportunities API, you send each one to Claude with a short prompt asking it to score relevance and apply a category label. The Streamlit app then sorts the results so the highest-scoring ones come first.
The starting prompt should be simple. Something like: "You are helping an infrastructure bid team identify relevant tender notices. Given the following notice, return a JSON object with two fields: a relevance score from 0 to 10 based on how well this matches infrastructure procurement opportunities (roads, bridges, water, civil engineering), and a short category label of three to five words. Here is the notice: [notice content]."
You'll want the response in JSON because that's what your code is going to read. Claude is good at returning structured JSON when you ask for it, and Claude Code will help you set this up correctly. If you decide to use a different LLM provider later (OpenAI, Google, anyone else), the same approach works, the key requirement is that the model can reliably return a structured response your app can parse.
Resist the temptation to write a long, elaborate prompt on the first try. Start with the simplest version that works, see how the scores come out for twenty or thirty real notices, then iterate. The most common mistake here is over-engineering the prompt up front and then being unable to tell which adjustment actually improved things. One change at a time. Look at the scores. Adjust. Repeat.
Two practical points. First, sending thirty or so notices to Claude on every page load will take several seconds, the user will see a loading spinner while it happens. This is normal. In phase five (hardening) you'll add caching so that repeat visits within an hour or two are instant; until then, just accept the wait. Second, the cost. Each scoring call costs a fraction of a cent. For a team of five checking the app once a day, you're looking at a few dollars a month at most. We've covered the rough numbers in the cost section earlier.
A note on tests
If you've never written tests before, you might think test-driven development is something serious engineers do because they have time on their hands. When you're working with an LLM, the opposite is true. Tests aren't optional engineering hygiene, they're the mechanism by which you find out whether the LLM built what you asked for.
Without tests, Claude hands you back four hundred lines of plausible-looking code and you have no idea whether it works. With tests, you get a yes-or-no answer in seconds. The tests don't have to be elaborate. They just have to describe what success looks like, and they have to run.
Tests also catch silent regressions, which is the worst pattern when you're building this way. You ask Claude to add a feature, it changes something it shouldn't have, and three weeks later you discover that the original feature stopped working. Tests catch this immediately.
When something breaks (and it will)
At some point, probably in the first hour of writing code, something will go wrong. Code that should work won't. An error message will appear that you don't understand. Claude will write something that doesn't do what you wanted.
The fix, almost always, is to tell Claude what happened. Paste the error message. Describe what you expected versus what you got. Ask "why did this happen and how do we fix it?" This works the vast majority of the time. Claude will explain the problem, fix it, and if needed, fix the test so it catches the same problem next time.
If you're stuck for more than fifteen minutes on the same issue, it's worth starting a fresh Claude chat (not Claude Code), describing the problem from scratch, and asking for a second opinion. Sometimes a fresh context is the unblocker.
The thing not to do is sit there feeling stupid. The whole point of working this way is that the LLM does the heavy lifting on the bits you don't know. Use it.
Common mistakes to avoid
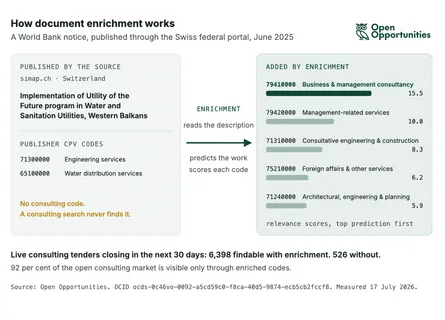
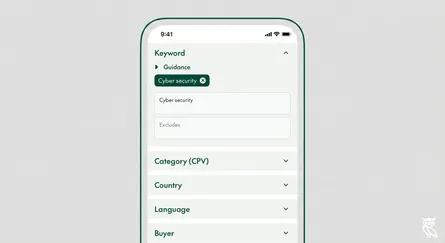
A handful of mistakes catch out almost everyone building against the Open Opportunities API for the first time. A more detailed walkthrough of the API's fields will follow in a separate piece, but these are the ones that cost the most time if you get them wrong.
Forgetting that bearer tokens expire. The API uses a bearer token for authentication, and the token has an expiration date. If your service runs for any length of time, it needs to refresh the token. Ask Claude to handle this with a simple check before each call.
Using the wrong date field. The API has several date fields and they're not interchangeable. Release date is when the notice was published. Date created is when we collected it. Tender end date is when the tender closes for submissions. Award start date is when an awarded contract begins. For a tender finder you almost always want release date. Mixing these up makes the results look broken in ways that take a long time to debug.
Filtering with the wrong CPV codes. The publisher's original codes appear in one field, our augmented codes appear in another. The augmented codes are more reliable, they work across languages, and they come with relevance scores. Use the augmented codes for filtering unless you have a specific reason not to.
Ignoring the unpublished value convention. Where a tender's value isn't published, the value field is zero rather than empty. If you filter for "tenders worth more than zero" you'll accidentally exclude a lot of legitimate tenders.
Expecting documents in the main response. The actual tender specification documents aren't in the main API response. They're available through a separate two-step process. For a first build, just show the link to the original tender URL and let users go and get the documents themselves.
Over-engineering the scoring prompt. The first version of your relevance prompt should be embarrassingly simple. The temptation is to write paragraphs of instruction telling Claude exactly how to think about every edge case, but you'll waste an evening tuning a prompt against three notices and then find the scores are still wrong on the fourth. Start short, score thirty real notices, look at the output, change one thing.
If you're committing the API documentation into your project as we suggested, Claude will get most of this right the first time. These mistakes mostly happen when people don't put the docs into the project and Claude is guessing.
Phase four: getting it onto a server
You've got a working app on your laptop. Now you need it somewhere your team can reach, that runs without you having to be online.
Choosing a host
For a first build, we'd recommend Render or Railway. Both are designed for novices, both let you deploy a Python application by pointing them at a GitHub repository, and both have a small free or low-cost tier that's plenty for this kind of service. You don't have to know what a server is to use them.
If you're already comfortable with AWS, EC2 is also fine. It's more flexible but it requires you to know more. For most readers, start with Render.
Vercel and Netlify, which you may have heard of, are designed for a different kind of application (mostly websites built around static content or JavaScript). Don't use them for this.
What you actually deploy
You connect your GitHub repository to Render. You tell it to run your Streamlit app. Render builds the app, deploys it, and gives you a URL where your team can visit it. The whole process takes a few minutes.
Your environment variables (API credentials and the Claude API key) get set in Render's dashboard, not in your code. Render injects them when the app runs.
A note on caching
Because the app calls both the Open Opportunities API and Claude on every page load, the first visit each day will take a few seconds while the scoring happens. This is fine, but you don't want the app to repeat that work every time a user refreshes the page or a second team member visits in the same hour. Streamlit has a built-in way to handle this called st.cache_data, which remembers the result of an API call or a scoring run for a period of time you choose.
Ask Claude to "add caching to the API and Claude calls, with a one-hour expiry." It'll know what to do. This single change makes the app feel instant for everyone except the first visitor of the hour, and cuts your Claude API costs in roughly the same proportion.
Making it private to your team
By default, once you deploy, the URL is technically public, anyone who finds it can visit it. For most internal tools this is fine in practice (the URL isn't listed anywhere, no one will stumble on it), but if you'd rather lock it down, Streamlit has a built-in way to add a password. Ask Claude to "add password protection to the Streamlit app" and it will walk you through it. You set the password in an environment variable on the server. Job done in fifteen minutes.
If you ever want to go further, proper user accounts, different permissions per person, that's a bigger project. For most teams, a single shared password is plenty.
Updating filters when your team's priorities change
A reasonable question: what happens in six months when the team decides they want to add a new category, change the relevance threshold, or rewrite the scoring prompt?
The answer is: open Claude Code, point it at your project, and ask. "We've decided we want to add healthcare procurement to the list of categories. Can you update the API query and adjust the scoring prompt to weight healthcare opportunities properly?" Claude makes the change, you review the diff, you approve, you commit. Render redeploys automatically when you push to GitHub. The whole thing takes ten minutes.
If you want this kind of change to be doable without touching the code at all, say, by clicking checkboxes in a settings page, that's something you can build into the app later. For a first version, asking Claude is faster than building a settings interface.
Phase five: maintaining what you've built
Here's the honest bit. You will need to come back to this. Not often, but more often than you'd think. The procurement publishing landscape changes, the API evolves, Claude gets better, your team's needs shift. A service built like this is not a fire-and-forget product, it's a small operational commitment.
Three habits make maintenance much easier.
Log the scoring
Every time your app scores a notice, log what Claude said and why. The notice title, the score, the category label. Keep the log short, a plain text file with one line per decision is fine. This means that when someone in your team asks "why was this tender ranked so low?" or "why did it miss this one?" you can look back and answer them, and adjust the scoring prompt if the answer reveals a pattern.
Don't over-engineer the logging. A line of text per scored notice is plenty. The point is to have a record you can scan with your eyes.
Watch the numbers
If you normally see thirty notices a day matching your criteria and one morning you see two, something is wrong. It might just be a quiet day, but it might also be that the API call broke silently or your filtering changed.
Adding a simple count of notices returned each day, displayed somewhere in the app or sent to yourself in a daily email, is one of the most valuable monitoring tools you can have. It costs almost nothing to build and it'll save you from finding out about silent failures three weeks late.
Don't be afraid to rebuild
The biggest advantage of building this way over writing everything by hand is that rewrites are cheap. If your scoring prompt or display logic has accumulated six months of patches and is no longer easy to read, throw it away and ask Claude to rebuild it from your CLAUDE.md and your tests. As long as you have tests that describe the behaviour you want, you can rebuild with confidence.
This is the opposite of how engineers normally think about code maintenance, but it's the right instinct when the cost of writing is low and the cost of maintenance is mainly your attention.
A reasonable maintenance rhythm is to check the logs once a week for the first month, once a month after that. Update the CLAUDE.md whenever you make a change you'd want to remember in six months. Run your test suite before any change goes to the server.
Building something that lasts
The thing that separates a service built like this that lasts from one that gets quietly abandoned isn't code quality. It's whether the person who built it can come back to it three months later and remember how it works.
The advice in this piece, taken together, is mostly about making your future self's life easier. A clear scope so you remember what you built and why. A phased plan so you always know what to do next. A good CLAUDE.md so Claude remembers it for you. The API documentation in the project so Claude doesn't invent things. Tests so changes don't break what already works. Simple infrastructure so there's nothing to relearn. Logs so you can answer questions about what happened. The willingness to throw things away and rebuild when it's easier than patching.
None of this is hard. It just requires being a bit deliberate at the start, rather than diving straight in.
If you want to build this and you don't have an Open Opportunities API key yet, get in touch and we'll set you up. The Expert tier is designed for exactly this kind of project. And if you'd like the CLAUDE.md, API documentation, and config files ready to drop into your project folder, you can download our starter pack.